Published On Mar 19, 2017
Hi Guys, today I’m reviewing the KitchenAid KSM1APC Spiralizer Attachment with Peel, Core and Slice. LINK to KitchenAid Spiralizer: http://amzn.to/2noJpJO
LINK to KitchenAid Mini Stand Mixer used in this video: http://amzn.to/2mNC31P
KitchenAid Mini Stand Mixer Review: • KitchenAid Artisan Mini Review
How the attachments works is by attaching it to a KitchenAid Stand Mixer and turning the mixer speed on.
This attaches to all KitchenAid Stand Mixer models.
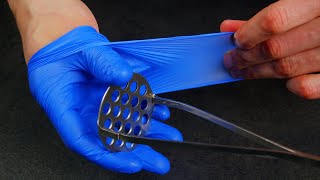
Comes in this storage box which has slots for all the parts. The box has magnetic closure which is neat. Most of the parts are metal with plastic tabs. It comes with the attachment body which goes into the head of your stand mixer, 4 blades and a peeling blade. The peeling blade is mostly plastic and reminds me of the as seen on tv potato peeler I reviewed a while back. Each blade has a picture on it. This is the spiral slice blade large core to use with apples and pears. This is the spiral slice blade small core for use with zucchini and beets. These two are the spiralizing blades, one is medium and one is fine, you can use either for potatoes and zucchini. This is the peeling blade that you can use with any one of the four blades. This is the skewer to which you attach your fruit and vegetable. The instruction manual gives you suggested speeds for each blade.
To use the spiralizer, first unscrew and remove the plate on your stand mixer head. Insert the attachment body, the shaft should fit it the square hub socket. This pin should fit into the notch. Tighten the screw. Put the skewer in and twist it until it clicks. I’ll try out all four blades so you can see the difference between them. First let’s try the Slicing blade large core with a pear. Put the pear on the skewer. I’ve washed the pear and cut one end of it. The cut end should be flat. You don’t have to cut the end that’s against the skewer. Put the blade in, the black tab just snaps in. Pull the release lever and push the blade carrier towards the food. Press the blade core into the food. Put a place underneath to catch the produce. Food that’s placed here can’t be longer than 5.5 inches and the diameter has to be between 1.5 and 3.75 inches, so skinny carrots like this won’t work. The recommended speed is 6, so I’ll turn the mixer speed from stir to 6. Turn the mixer off. Remove the blade first, it just pulls off, then the food.
I hope you found this review helpful. Subscribe and I'll see you next time. Thanks for watching :)