Published On Sep 24, 2021
Welcome to my channel, Homes for Beginners where I show you how to do repairs around the house yourself. Please don't forget to hit that LIKE button and SUBSCRIBE for future videos.
#electrical #OEMTOOLS #homerepairs
In this video I will be showing you how to repair an extension cord. In this situation, admitting my own fault, I ran over the extension cord with the lawnmower and as you can see it cut off the end. As long as the cord isn’t damaged, it can be reused. This is a three conductor wire consisting of ground, neutral, and hot.
OEMTOOLS 22588 multi-bit screwdriver: https://www.mobiledistributorsupply.c...
Inspect the cord for any further damage beyond the cut area. Ensure there are no cuts or breaks in the outer casing. If there is, the cord will need to be cut back past this, ensuring the cord is still safe to use. I do not recommend reattaching the cut end as the repair may risk being a safety concern. Using heavy cutters, trim the wire.
For the replacement end, there are two versions, the male and female ends. You’ll need to purchase the required end which was damaged on your cord. If you have a three conductor wire, you’ll need a three prong plug. Disassembly procedures for these plugs will also vary. This particular model can have the backside unscrewed.
After that is removing the nylon retainer which clamps down on the cord to hold it in place. To access the terminals inside, the screws will need to be removed on the face so the assembly can be split down.
Once those three screws have been removed on the front side, pull it out.
Install the back cap onto the cord first along with the nylon clamp. Each prong will have it’s own terminal where the wire connects into. The wire is clamped into place using a screw, ensure these are loose first.
Using a razor knife, carefully cut the outer casing. Do not cut the insulation on the individual wires, otherwise it will pose a safety risk. Typically you can score enough of the surface where you can break it off at the cut line, but this will depend on the material.
The length which is required to be cut back will depend on your new plug replacement. It should be hidden in the inside, so no exposed individual wires outside of the plug.
Using wire strippers, strip the insulator off of each of the individual wires. Use the appropriate sized wire gauge stripper, expose enough of the conductor so it can be fully seated in the plug contact clamps. The insulation should be against the clamp so there’s no risk of any material falling inside which can create a short.
Once the wires have been stripped, the copper wiring does have a black discoloration which means it’s oxidized.
You can cut the wiring further back to expose a cleaner spot, The conductor can be chemically or mechanically cleaned. I ended up cleaning the exposed conductor with a scotch bright pad until the copper was back to it’s natural color.
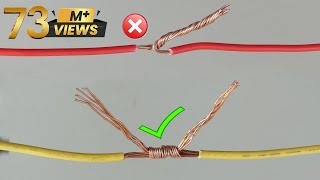
As for which wire goes where, green goes to the green terminal which is ground, white is common which goes to the silver terminal and black is hot which goes to the gold terminal. However if you are unsure or the wiring is a different color, use a multimeter.
Set the multimeter to the continuity test, always test the meter first to ensure it’s working. You can do this with the cord only or plug in the new replacement plug to the cord.
Continue to test each of the wires and terminals, then connect each as needed. Doing this will also ensure there is no broken conductor within the cord which you can’t see from the outside.
Insert the mid section onto the cord now.
When you know the correct position of the wire, insert the wire and make sure the conductor is fully seated in the clamp. Then tighten the clamp. Make sure it’s tight. The conductor is strained wire, this can be twisted lightly so no strands are pushed off to the side when inserting it in the connection.
Next is installing the first section of case. These will usually have alignment tabs and can only fit in one orientation. When it’s properly seated, install the screws on the face. Install the nylon retaining clamp, this too has a specific orientation and fits into slots on the outer shell. Install that rear screw-on cap. When tightened, it’ll push down the nylon clamp, firmly holding the cord in place.
Before use, we can verify the cord is functioning correctly with the multimeter. Test the terminals from each end using the continuity test just like before.
© Homes for Beginners 2019
All Rights Reserved
No part of this video or any of its contents may be reproduced, copied, modified or adapted, without the prior written consent of the author.