Published On Oct 29, 2023
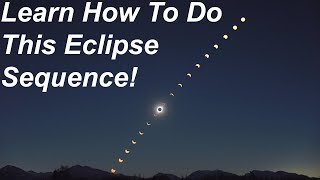
In this video I'll show you how to create a beautiful solar eclipse timelapse video. We will need 3 different tools - PixInsight, Photoshop, and Bridge.
Thankfully, the main workflow is pretty easy. You'll start by debayering your images, either with PixInsight or Lightroom/Camera RAW. Next, we'll use PixInsight's FFTRegistration tool to automatically align all of the images. If you don't have PixInsight, there may be an alternate way to align your images automatically, but I'm not currently aware of one. Worst case scenario, you can manually align every photo with Photoshop, as I show later in the video.
With the images aligned, we can convert them to JPEG with PixInsight's Batch Convert script.
At this point you should have all of your images in the JPEG format, but the naming scheme is probably very convoluted. We'll use Adobe Bridge to select all the JPEGS, then right-click and choose "Batch Rename". I recommend something like "AlignedEclipse001" to start.
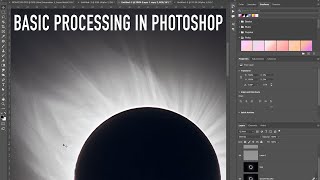
The last step of the workflow is to open up Photoshop then go to "File - Open". Select the first image in your sequence, then click the box for "Open Image Sequence". DO NOT SELECT ALL PHOTOS AND CLICK OPEN.
It will ask what framerate you prefer, I'd recommend 24FPS.
This should create a timelapse video in Photoshop. You'll want to go up to "Window - Timeline" to see the video timeline. Scrub through the video timeline and see if there's any problems. I had to flip vertical and horizontal, so that the eclipse is properly aligned. Beyond that, you'll want to add some Adjustment layers to make the video look nice.
When the video looks good, you can render with "File - Export - Render Video". I'd recommend 3840 x 2160 for the size, and 24FPS.
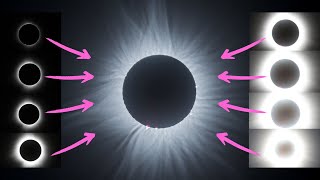
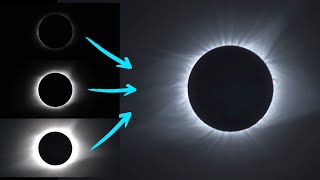
When the video is rendered you should watch through it and look for any problems. In my case, I had to manually align a single frame. This is what led us down the long, convoluted rabbit hole.
00:00 - Debayer Photos
02:09 - Check Images
03:10 - Align Photos with FFTRegistration
05:15 - Convert XISF to JPEG
06:35 - Batch Rename with Bridge
08:37 - Create Timelapse Video
15:11 - Check Video for Problems
16:06 - Find Un-Aligned Photos
17:23 - Align Photo(s) in Photoshop
20:39 - Precise Alignments (Getting Sidetracked)
22:21 - Align Photo (Back on Track)
23:47 - Optional Manual Alignment Technique
30:31 - Create Final Video
32:19 - Video Comparison