Published On Dec 19, 2022
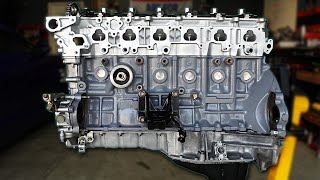
Installing pistons, rods, crankshaft, and bearings into my freshly machined Toyota 1FZ-FE engine block! Finally making some progress on the 80 Series Land Cruiser engine rebuild! This block has been bored .020" over, honed, resurfaced, the crank has been polished, the rods have been cut/resized, new pistons, rings, and everything to completely overhaul this engine and make it as good as new (or better!)
Follow me on Instagram:
/ _rmgarage
Other videos from this Land Cruiser 80 Series build!!
► Full playlist: • 1993 Toyota Land Cruiser
► Fixing the Cracked Engine Block: • How to ACTUALLY FIX a CRACKED Engine ...
► Full Engine Teardown EXPLAINED: • Toyota 4.5L Inline 6 Engine Rebuild -...
► FZJ80 Engine Removal: • Removing My Land Cruiser's Engine - 8...
Tools Used In This Video:
Piston Ring Filer: https://amzn.to/3WKPE8b
Piston Ring Pliers: https://amzn.to/3Wasdoz
Ultrasonic Cleaner: https://amzn.to/3FCHtUb
Torque Wrench: https://amzn.to/3WqulbF
Lucas Assembly Lube: https://amzn.to/3YAov9C
Piston Ring Compressor: Summit Racing
Camera Equipment:
Sony ZV1 Camera: https://amzn.to/3VX5koq
Rode Microphone: https://amzn.to/3He5Eux
Lens: https://amzn.to/3VYL0TD
Tripod: https://amzn.to/3BcYiDL
0:00 Intro: Cleaning Block and Prepping Surfaces
5:50 Installing Oil Squirters
6:50 Main Bearings, Thrust Washers, Installing Crankshaft
8:30 Checking Bearing Oil Clearance Using Plastigage
9:00 Installing Main Caps, Crankshaft Torque Specs, Checking Thrust Clearance
10:50 Gapping Piston Rings (we actually ended up at .020")
12:41 Installing Piston Rings
12:55 Installing Pistons With Tapered Ring Compressor
13:40 Checking Rod Bearing Oil Clearance Using Plastigage
15:00 Installing Remaining Pistons
16:40 Outro, Build Updates, Etc
#toyota #landcruiser #restoration #rebuild #1fz #engine #rebuild #auto #4x4