Published On Oct 31, 2016
https://www.ronhazelton.com/
Laying tile over a plywood subfloor can be tricky, but if you prepare the sub floor properly, your tile floor will last for a lifetime. Learn more: http://bit.ly/2dVbNj2
With over 500 hundred free DIY ideas, tips, how-to's, suggestions, and video tutorials available to help you turn your home improvement plans into finished projects. With more projects being added every month this is the go-to place for Do-It-Yourselfers & professionals alike.
Follow Us On Twitter: / ronhazelton
Like Us On Facebook: / ronhazeltonhousecalls
Follow Us On Google+: https://plus.google.com/u/1/b/1065954...
View Our Pinterest: / ronhazelton
Don't Forget To Subscribe: / @ronhazelton
Transcript:
When it comes to setting tile over plywood floors, there's no one who knows how better than master tile setter, Armen Tavey. In fact, he's invented a patented method and material that virtually guarantees professional quality results. However, as Armen points out, it's what's under the tile that makes all the difference between a tile job destined for failure and one that's guaranteed to hold up for the life of your home. That's especially true when the tile is being laid over a plywood subfloor.
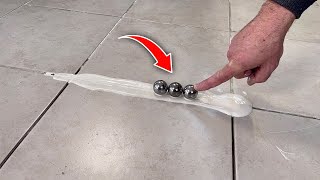
Before laying tile over any plywood subfloor, it's important to make sure that the floor itself is free from excessive deflection or bending, which can pop grout joints and loosen or crack tiles. A glass of water can detect deflection that's otherwise hard to see with your eye. A single sheet of three quarter inch plywood is normally not adequate as a substrate for tile. The tile industry recommends a subfloor that's at least an inch and a quarter thick. In this case we're going to add a second sheet of three quarter inch exterior grade plywood. The plywood seams where the sheets meet should be offset from each other. This provides added strength and minimizes flexing at the joints.
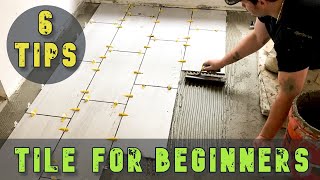
Another way to reduce deflection is with proper nailing. Use a chalk line to mark out a grid. Underlayment should be nailed or screwed every eight inches in the field and every six inches around the perimeter. The nails themselves should be long enough to pass through both layers of underlayment. Be sure to drive all nail heads, flush with or below the surface with an extra hammer blow and leave one sixteenth inch gap between sheets to allow for expansion. Now this may look like overkill, but a properly installed subfloor is an important key to a trouble free tiling job. Laying out a tile job can mean literally that, actually laying out the tile across the room in both directions, using spaces for the grout joints. What you want to avoid are narrow slivers of tile around the edge of the room or tiles of differing widths on one side of the room versus the other. Slide tiles back and forth until you end up with edge tiles that are an attractive size and equal in width. The tiles that go around the perimeter of the room can be cut to width using a manual scoring type tile cutter. A carbide wheel scores the surface, then a bar exerts pressure on both sides of the cut, cleanly snapping the tile along the line.
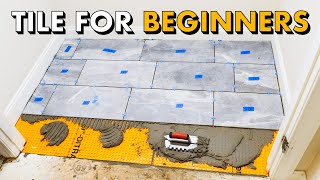
With the layout complete, it's now time to begin preparing the surface for tiling, using Armen Tavey's thin skin system. First, he applies a code of adhesive to the subfloor, using a straight trowel. Then he lays fiberglass reinforced paper mats, he calls them thin skin, on top of the adhesive. Finally, he presses the paper into contact using a wide putty or joint knife. Next, he mixes, then applies a thin skin coat of mortar that conditions the paper. Once again, he uses a straight edge trowel to spread the material. The mortar, in effect, acts as a sort of primer on the paper, creating a cement surface to which the tile will bond perfectly. Using a knots trowel Armen now applies a coat of thin set tile mortar. Notice how he holds the trial at a 45 to 60 degree angle, allowing the notches on the trowel edge to create uniform rows or ridges. This ensures that the mortar is laid down evenly and at the proper thickness so that the entire back of the tile will be in contact with the material. Now it's time to set some tile!
Watch the technique. I set the tile, drop it down, I'm going to push it forward about a quarter of an inch to three eighths of an inch. What does this do? It takes the high ridges and drops them down into the low ridges or no ridges, pull it back. What I've done is I've transferred mortar to the back of the tile, more than likely one hundred percent.
.