Published On Jan 6, 2020
Welcome to my channel, Homes for Beginners where I show you how to do repairs around the house yourself. Please don't forget to hit that LIKE button and SUBSCRIBE for future videos.
In this video, I will be showing you how to do shou sugi ban on deck boards. First off I am doing this on untreated wood which is important. Any wood treatments such as pressure-treated which has a chemical applied will cause fumes which can be hazardous to your health.
Amazon links of various products used in the video for both USA and Canada:
USA
Large propane torch: https://amzn.to/3jnAx1V
Small propane torch: https://amzn.to/2Lu4JvK
Flint striker: https://amzn.to/3a01GoF
Boiled linseed oil: https://amzn.to/3tA0D6f
Brass wire brush: https://amzn.to/2MJM1ka
Stainless steel bowl: https://amzn.to/3rsX5kv
Heat resistant gloves: https://amzn.to/2Lx7kFi
Canada
Large propane torch: https://amzn.to/3ruKa1G
Small propane torch: https://amzn.to/3jnkFMV
Flint striker: https://amzn.to/3cMps98
Boiled linseed oil: https://amzn.to/3pV8t8o
Brass wire brush: https://amzn.to/36P0jH6
Stainless steel bowl: https://amzn.to/3cRKjIf
Heat resistant gloves: https://amzn.to/39VKRuJ
The boards have already been cut to length and pre-drilled for any screws. For burning, if you are new to this, I would highly recommend testing this method out on a piece of scrap wood first. Here I am using a large propane torch.. The hotter the flame, the quicker the burn so set it to whatever you’re comfortable with. I have found it’s easiest to start with the sides of the boards first. Don’t put the boards together, any small gaps between the boards due to bowing may not cause an even or clean burn.
Any knots in the wood won’t burn like the rest of the grain, they can be left as is or you can touch them up with a torch. Edges will burn quicker than flat areas, the efficiency of burning can be affected by the temperature outside along with the wind. It’s best to do this on calm warm days, even with a higher flame, the wind can greatly increase the amount of time required to burn the surface. These are 2x6, 12 feet in length and it takes about 10min per board to burn. The board must be burned all the way around to provide a proper barrier. Only burning it on the top still allows the wood to be affected by the elements from the sides and underside. The boards will be warm, so handle with care.
This method dates back at least a couple centuries and was a traditional Japanese method to treat wood, specifically Cedar. For this I am using Spruce, Cedar is the best type of wood used due to its properties, however, it can be used on other woods but results will vary. This type of treatment is intended to have a much longer life than compared to other wood treatments, this can be done in a variety of burns achieving different colors or finishes, is water-resistant, fire-resistant, and insect resistant.
The wood can be left with the charcoal finish on the outside of this can be cleaned up. To clean off the charcoal, I am using a brass wire brush. Go with the grain of the wood, not against as it can make marks in the finish. The more you drag the wire brush on the surface, the more it’ll clean off the burnt finish and the lighter the wood will be. Clean off the loose charcoal.
I am using boiled linseed oil, it's being heated up to make it a thin viscosity, allowing it to soak into the wood quicker. After it has been heated up, the torch is turned off and add an equal amount of turpentine, so a 50/50 mixture of boiled linseed oil and turpentine. The turpentine further improves dry time and it’s the ability to soak into the oil. The linseed oil will provide a light amber color, but most importantly seals the wood.
Wear a glove when dealing with the hot metal bowl, using a brush to apply it to the top and sides. As a cautionary tip, linseed oil is known to spontaneously combust, so any items soaked in it such as rags should be washed with water and left outside to dry before disposing of.
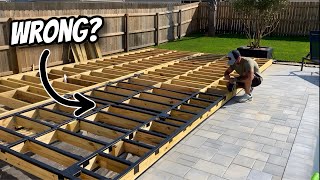
Finally is installing the deck boards. While the frame of the deck isn’t done, it can be as well.
After a month, the boards are currently dry and before the weather gets cold and the deck is exposed to snow, a second coat of the 50/50 mixture with the turpentine and linseed oil is applied. The oil should be applied once a year as basic maintenance, it won’t need to be stripped or sanded. The wood will eventually become saturated with the oil, protecting it from the elements. The smell can be quite strong at first and will usually disappear in about a week. You’ll notice the finish does repel the water extremely well, maintenance is much less than compared to a traditional stain, it won’t peel, and the cost is about the same depending on the quality of stain.
© Homes for Beginners 2019
All Rights Reserved
No part of this video or any of its contents may be reproduced, copied, modified or adapted, without the prior written consent of the author.