Published On Oct 29, 2023
#TOYOTA #toyotacentury #handmade
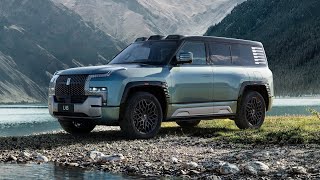
We get the honor of detailing the all-new Century. #SUV
A new chauffeur-driven vehicle*1 to meet the demands of a new age, developed under the concept of "The Chauffeur." Fully embracing the ideas of inheritance and evolution associated with the Century, the new shape combines elegance, comfort, and functionality.
A bold design with an elegant and graceful silhouette that incorporates Japanese aesthetic elements.
Based on a concept of human-centeredness, the interior space is designed to provide an even more safe and comfortable travel experience for rear-seat passengers as well as the driver.
The newly developed plug-in hybrid system, which inherits the quietness of the Century and delivers both environmental performance and a powerful, exhilarating ride befitting the future of chauffeur-driven vehicles.
Specifications
Century [Reference] Century (sedan)
Length 5,205 mm 5,335 mm
Width 1,990 mm 1,930 mm
Height 1,805 mm 1,505 mm
Wheelbase 2,950 mm 3,090 mm
Couple distance 1,220 mm 1,135 mm
Weight 2,570 kg 2,370 kg
Capacity 4 persons 5 persons
Manufacturer's Suggested Retail Price
Powertrain Transmission Driveline Price* (JPY)
(including consumption tax)
Series Parallel Plug-in Hybrid System
(2GR-FXS 3.5-liter V6 engine) Electric continuously variable transmission E-Four Advanced 25,000,000
#PHEV #toyotacrown #lexus
JOIN for membership to get access to perks: / @kirkkreifels
🔋 Buy my EV level 2 Charger: https://amzn.to/43MKEno
📷 Buy my Camera: https://amzn.to/3ONQ9NS
🎥 Buy my BIG Camera: https://amzn.to/43lhk71
🏎️ Buy my Youtube Gear: https://www.amazon.com/shop/kirkkreifels
👣Like my daily Drivers? Get 10% off with KIRKCARS @ https://bit.ly/3mvVXiQ
👕BUY merch: www.kkcarshop.com
🔥 Instagram: / kirk_kreifels
🎵 www.audiio.com
00:00 - Exterior
02:42 - Frontseat
06:36 - Cargo / Powertrain
09:42 - Backseat
14:12 - Conclusion