
Published On Dec 3, 2023
Learn how to upgrade boring wood posts with this Genstone pillar / column wrap Installation video!
Product and Materials 🛠🧰 Needed for this Project: https://amzn.to/3RpQgQz
Genstone Artic Smoke Pillar Wrap Product: https://bit.ly/3R40VPr
I reached out to GenStone about providing a discount to my audience and they noted that if you call their project coordinators at 303-876-4333, they may be able to hook you up! Let me know down in the comments if they were able to provide you with a discount! **Note - I am NOT being paid by GenStone.
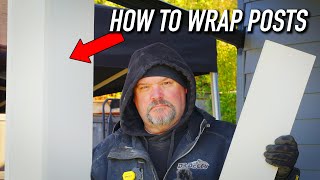
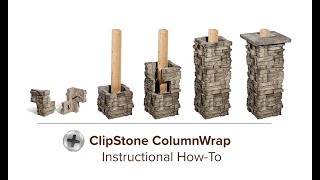
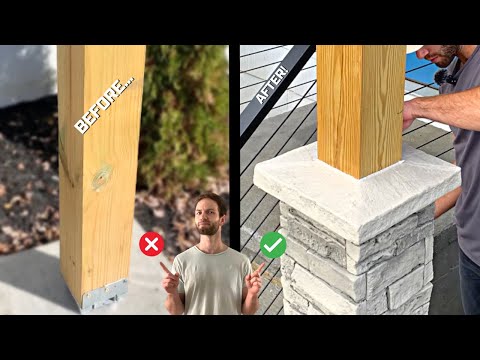
In order to upgrade wood posts with a GenStone stone veneer column / pillar wrap, you will need to follow these basic steps:
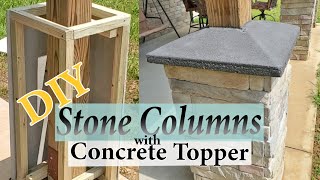
1. Shim / "Furr" the existing wood posts to 7-3/4" x 7-3/4"
In order to install the GenStone Pillar Wrap, you will need a post column that is approximately 7-3/4" x 7-3/4". If you are working with a 4"x4" or 6"x6" post (like me), that means you will need to "Furr" out the post to achieve the desired column size. In order to Furr out my 6"x6" post, I installed a 5/8" fence picket and a 1/2" strip of plywood on each side of the post (both the pickets and the plywood were pressure treated and rated for exterior use). After attaching the pickets and plywood to the posts, I was left with a post thickness that was pretty close to 7-3/4" x 7-3/4".
2. Install the Pillar Wrap Product
After furring out the wood posts, you can begin the pillar wrap installation. It is recommended that you first mark a level line on the post to indicate the top of the pillar. Since my pillar height will be 48" tall, I marked this height on the post and then I positioned the pillar panel in place. After confirming level, I secured the pillar panel to the wood post using exterior rated deck screws that were similar in color to the pillar panels (grey). I also used exterior rated construction adhesive on the back of the pillar panels for extra holding power. Next, I interlocked the next pillar panel with the panel I installed first, checked level, and then screwed it in place. I then repeated this process for the rest of the post wrap project.
3. Install the Pillar Wrap Post Cap
To install the pillar wrap post cap, you will first need to cut it in half. I cut my post caps in half using a hand saw. Next, you will need to mark the cut out for the 6"x6" post and then cut out the penetration in the post cap. To do this, I used a hack saw and a coping saw. After cutting out the penetration for the post, you will need to mix up the color match caulk that will be used to attach the two halves of the post cap back together. Mix up the color match caulking according to the manufacturer's instructions and then apply it to both sides of the pillar cap. You can also use construction adhesive to help glue the pillar cap to the post and the pillar panels below. Place both halves of the post cap in place and press them together. Secure them to the posts using screws and also screw the two halves of the post caps to each other. Clean up any excess color match caulk using a paper towel. Finally, caulk between the post and the post cap to ensure a water-tight seal.
Overall, installing this GenStone Pillar Wrap Product was not too difficult and I think this project can be tackled by the average homeowner. I am pretty happy with the final result and I can't wait to show you all the Gable Porch Overhang that these posts are supporting!
Thanks so much for watching and I will see you on the next one!
- Andrew
▬▬▬▬▬▬▬▬▬▬▬▬▬
Follow me on Instagram: / atimprovements
Check out my Blog: Atimprovements.com
Subscribe to my YouTube Channel ⬇️ https://www.youtube.com/c/AndrewThron...
Check out my Website for additional DIY Content: https://atimprovements.com
▬▬▬▬▬▬▬▬▬▬▬▬▬
Thank you so much for watching!
*All content on the Andrew Thron Improvements YouTube channel reflects my own opinions. Please seek out guidance of professionally trained and licensed individuals before making any decisions. Links in the description may be affiliate links.