Published On Aug 15, 2022
Time Stamps:
• 0:00 to 0:40 = introductory comments;
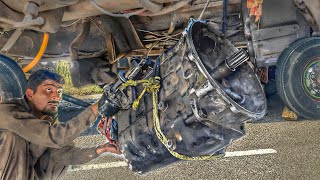
• 0:41 to 3:47 = showing location of part and what has to be removed;
• 3:48 to 6:48 = marking the propeller (i.e., drive) shafts;
• 6:49 to 9:00 = rear propeller shaft removed and size of bolt/nut;
• 9:01 to 10:20 = how to remove the rear-side of the front propeller shaft on the transfer case side;
• 10:21 to 13:24 = pic showing the propeller shafts removed, slip yokes must have no burrs on them or wear or the new seal will leak;
• 13:25 to 17:17 = showing the rear engine mount (cross member) removed, location and positions of bushings; how to support transfer case when cross member is removed;
• 17:18 to 21:54 = rear engine cross member and how to install if you forget its orientation; how the transfer is supported when the rear engine cross member is removed; location of transfer case electrical plugs; how to get to the transfer bolts;
• 21:55 to 25:20 = showing how the transfer is secured before separating from the rear auto tranny extension housing; showing a clear pic of the transfer electrical connectors to be disconnected;
• 25:21 to 26:47 = problem is separating the transfer case;
• 26:48 to 30:45 = NOTE: missed one bolt on transfer case, it is at the very top of the case, you cannot see it, need an inspection mirror, use a 12mm combination flex wrench;
• 30:46 to 32:57 = transfer case removed from the vehicle;
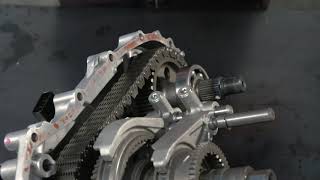
• 32:58 to 35:15 = showing the separated front case;
• 35:16 to 38:08 = remove the 6 bolts that hold the input gear assembly to the front case, then take a rubber mallet/dead blow hammer and gently hit/tap the front shaft and the 2 assemblies (input gear assembly & counter gear) will separate together, DO NOT TRY TO REMOVE THE COUNTER GEAR BY ITSELF!!!;
• 38:09 to 39:30 = input and counter gear assemblies removed, now the seal is exposed, use a flat punch and tap carefully around the outer seal in order to remove it from the case; you can use the old seal to push the new seal in;
• 39:31 to 44:15 = will be replacing both front and rear transfer case output seals;
• 44:16 to 47:37 = showing the new input seal; use the old seal to install the new seal, the new seal’s spring side is facing up towards you!;
• 47:38 to 50:23 = new transfer case input seal installed into front case;
• 50:24 to 52:43 = torque input gear assembly bolts; install counter gear first and then the input gear assembly;
• 52:44 to 53:29 = note how the silicone is put on the case (goes in the bottom of the bolt holes), it should be 1.2 mm in diameter, make sure the surfaces are clean before applying the silicone;
• 53:30 to 54:54 = torque the front case bolt evenly and in a criss-cross pattern;
• 54:55 to 01:03:22 = front transfer case yoke, will be using this later on in the installation; can use a ¼ inch drive ratchet with a 12mm regular 6 point socket to tighten the top transfer case bolt, very tricky to get this bolt in!!!; install the front transfer case yoke to the rear output shaft of the transfer case and move the yoke back and forth so the splines line up to the transmission and then push the whole transfer case assembly to the back of the transmission; don’t forget to reconnect the 3 electrical connectors that were disconnected previously;
• 01:03:23 to 01:07:56 = make sure all of your paint marks line up on the front/rear propeller shafts;
• 01:07:57 to 01:12:51 = TIP: connect the left side exhaust hanger rubber bushing first before installing the rear engine/transmission cross brace; don’t forget to fill the transfer case with oil when done!;
Torque Values:
transfer to transmission bolts, transfer front case bolts & transfer input gear plate bolts: 204 inch pounds; strut bracket nut: 98 foot pounds;
stabilizer joint nut: 36 foot pounds; tie-rod end nut: 31 foot pounds;
brake bleeder screws: 5 foot pounds; front caliper bracket bolts: 61.5 foot pounds; front caliper guide pin bolts: 26 foot pounds; front drive shaft nut: 145 foot pounds; front propeller shaft bolts: 22 foot pounds; rear propeller shaft flange nuts: 61 foot pounds; wheel lug nuts: 80 foot pounds;
OE Suzuki Part numbers: 09283-40037 transfer case front output seal (40X54X7.3); 29283-66J30 transfer case rear output seal (40X54X7); 09283-48015 transfer case input shaft seal (48X62X7); • 24771-54J30 automatic transmission extension case oil seal;
Description:
This is a talk-only video on tricks and tips on replacing the transfer case input shaft seal, transfer case front and rear output shaft seals on a 2006 Suzuki Grand Vitara JLX-L, 2.7 V6 petrol engine.
I did not show the actual repairs itself, being by myself with only my camera phone really gave me no other option, however, I hope I was able to help some Suzuki Grand Vitara owners.
If there are any questions, please leave them in the comments below and I will answer back. Thank you for watching.