Published On Premiered Apr 14, 2020
Hi everyone, In this video I show you how I've made a soft feeling iron man mask, could be a punching ball or face.
PUR used here is called: PUR E60 v-sure from Vosschemie Benelux,
Link to the product lower in this description.
The production of this mask involves a few common tricks in prototyping with composites. Like always some trial and error will be involved as you can see in this video.
The projects starts with making a new strong mould. Normally I would go with the uni-mould system, which produces strong stable moulds, but for this project I decided to try it with some regular laminating polyester, this is the polyester resin that is pretty commonly available. Very important is to build up some thickness in different steps. This means adding some layers of CSM fiberglass and let it cure. Then sand to create a good mechanical bond. repeat this step a few times till you're happy with the thickness and stiffness of your part.
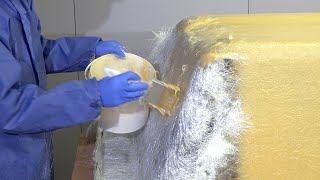
Once the new mould was ready a new mask is made in this mould with fiberglass. Don't forget to add release for a good removal out of the mould. The surface doesn't need to be perfect, you just want to have a part that fills the volume inside. Once this is done and the polyester has cured, I poured an amount of density 75 expanding polyurethane to fill the void in the mask all the way up. Once cured after 1 hour you can proceed to flattening the back to a nice and level surface. Once this is done it is time to seal the back of the part before we can make the backing plate of the mould. This is done by adding some polyester resin with CSM fiberglass to create the back of the shell. Make sure to nicely finish the back of the mask as well as any big surface imperfections here will be visible on the things you cast with polyurethane later on. Once this is done we can proceed with making the back of the mould. First apply release agent and repeat the steps we did in the beginning of the video using a gelcoat and build up of fiberglass with polyester resin in multiple steps. Once this is done you can demould the 2 part mould and remove the mask we've used as a master to make the new mould.
Clean the mould, sand and polish where needed and apply release agent.
The Chemical release agent from easy composites called easy lease can be used here or if you want a specific release for polyurethane resins you can find one on following link https://www.vosschemie-benelux.com/nl...
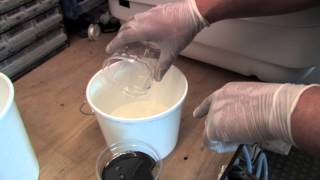
Once your mould is ready we can proceed to mixing and pouring the soft PUR (polyurethane).
As with using new materials you'd better do a few testruns first. This is how I mostly do this:
PUR E60 v-sure from Vosschemie Benelux:
https://www.vosschemie-benelux.com/nl...
As polyurethanes expand while curing it's good to test out how much it will expand in which way. That's why I start with mixing a low volume in open mould and go up to find the exact right amount needed. The right amount would be to have some pressure build up in your closed mould but not to much. The amount of force generated by the PUR can be a lot. Causing it to break, warp, destroy your moulds!
First trial didn't have enough material mixed, Second one was right, Third one was tested with closed mould and could use a bit more mixed PUR.
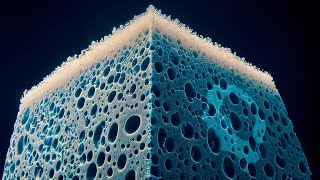
Using the E60 PUR on it's own will still have a foam texture with small holes. How to fix this is by using: https://www.vosschemie-benelux.com/nl...
The inmould coating applied first into your mould will create a soft touch plastic feel with a fully closed skin on the outside of your part. This is pretty similar to a gelcoat while making moulds. You have to move quickly through your material after mixing as it is fast setting (which is a good thing if you want to make multiple prototypes in a short amount of time. The E60 PUR and PUR inmould coating can be tinted to any desired colour using PUR pigments. Keep in mind that while the E60 PUR is expanding it will faint a bit in strenght of your color. For example if you are not using enough red, after epanding your part might look pink (sometimes not desired)
Once your Inmould coating is cured in a b-stage (hard enough but still a bit tacky) you can proceed with mixing the amount of E60 you have found out to be the best for your project and pour it quickly in the mould and close the mould. You'll have to move quickly as the resin is expanding rapidly after mixing. Let it all harden out and remove out of the mould. If you still need to cut of a bit of the flanges you can use a sharp blade or scissors.
I hoped you liked this video, if you need more information, don't hesitate to contact me!
Facebook: / mat2composites
Instagram: matthieu.libeert
Twitter: @matthieutje65
web: https://www.mat2composites.com