Published On Apr 8, 2019
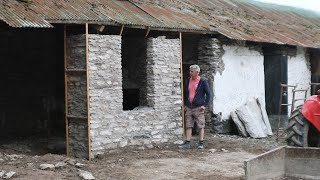
Vangjel explains how he uses large sandstones to make suitable formats for the new natural stone wall with only a hammer.
sledge hammer: https://amzn.to/2I9mRaL
club hammer: https://amzn.to/2VyrZIS
safety glasses: https://amzn.to/2D5ip93
work shoes: https://amzn.to/2UnUo7Z
work pants: https://amzn.to/2D2Rkn1
work gloves: https://amzn.to/2FXKFuR
4k Gopro: https://amzn.to/3878qAx
Gopro head strap: https://amzn.to/2XzhR7A
Gopro bicycle mount: https://amzn.to/2xDfK3l
Tripod: https://amzn.to/34NcAvm
The links above are affiliate links that belong to Amazon or Ebay partner programs. If you buy something through these links, I will receive a commission, of course without you having to pay anything more. Thanks for your support!
For contact options and links check my channel info,
Thank you for your interest in my videos!
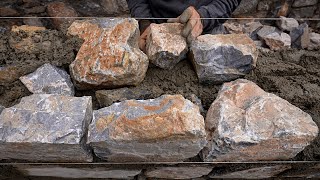
Hi this is Carl the Landscape Guy. Today's video is about how to prepare natural sand stones to fit for a wall. Vangjel is showing us how he does it with simple tools and I hope this video will help you in case you are looking to build a natural stone wall. First of all make sure your Hammer is not too short so you don't hit your fingers. Getting your fingers crushed can be very painful and especially if you work all day and your arm gets tired you get hurt easier. Ok so now we have our first Stone here and we will shape it nicely. This stone has a nice face but we can not put it in the wall like this because he is not wide enough to sit in the wall deep enough. Since we must have at least 15 to 20 cm and at most 25 at a 50 cm wide wall. So we take the other side as the face. So now we have made a new face here. So turn it around now and see if it is straight enough. We'll take this hump out a bit and then this side is good. On the other side take this corner out and finished. We got two pieces out of this one. Now let's turn this one over. look how beautiful the stone is. the stone had a funny shape but now we have two matching stones that we can work with. that's what they look like now and their size fits very well with our wall. Now we take the small corners away carefully. so why do we have to be careful here now? well we can not just cut it off around the corners because then we end up with an egg shaped stone. That's why we are very careful. Turn the stone over. Break the corners away a bit and you're done. Now we have a beautiful stone. now the other one. the same. edit something here. and here again we have a beautiful stone. we do it here as well as on the other side. here we have to hit hard to break it all the way. ok next one is frozen to the ground a little. Of course that's the dull side right now. We have two pieces of it. We could use both sides as the face but we take this side because it is bigger. if we get rid of this corner here then the little one is there this page is bigger. we'll do that up here and have it sit stable while we work on it. ok we got another nice one for our wall. Ok this one is all set for now. The next bulky one. Oh no, that's not good, it must have had a bad crack. Sure we will be able to use this one and this one for smaller spots. this is bad. But this one we won't be able to use, at least not in the front. Maybe for filling in the back. Now this one here looks like it is no good but look. We need these thin stones too. We will make something out of it, watch! Here we go. Almost the same with this one but we will use it. But here we have to use a short side as the face because it is not wide enough to sit in the wall stable. Our wall will be 50 cm wide and we want the stones to sit in as deep as like 20 cm. Now we continue with this one here. It is a white one which does not fit that well with our wall. Since they have a really good shape we will use them on the back side. It's only the color that does not fit to the customers wall. You see, that's a nice stone, too. it has a good face and we can make a corner of it too. this side has a beautiful face and we will leave these like they are for now. This one is frozen to the ground again because it's so cold. Now to crack this one from this side is hard to do i have a feeling so we will use the other side. Both sides are in the air technically. That helps to break this one easier. It's also good even if it does not look like that. We will make three out of that one. Here we have one that we can not make a good face out of because this is very soft and it has many layers. It is possible, but only with a chisel and it will take very long. On this wall we have the option to use these type of stones in the back side because it will be invisible. This soft rock also has many layers and you can see clearly there is a long crack in it. One side is hard and the other side is very soft. So and what else do we have. This one to me seems like it will break weird. Therefore, it is best to always install such stones in the first bottom row below because they are stable and wide.
#sandstone #masonry #wall