Published On May 25, 2020
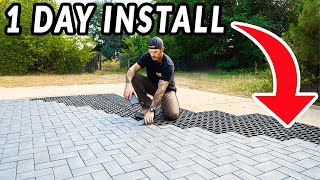
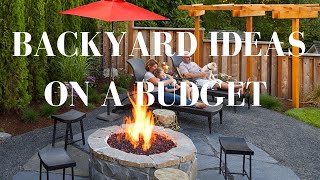
This DIY paver patio cost us less than $900 (2016) to install in our backyard. We used foam paver pads to eliminate the need for gravel.
For more information go to the Brock Paver Base Website
https://brockpaverbase.com/ (Not Sponsored)
F A C T S
2016 Cost
We live in the Midwest and have flat land.
Snowy winters.
We had this patio for three years. We no longer live here.
Not for vehicles
We are not professionals and cannot not guarantee that yours will turn out the same.
Brock Paver Base has instructions on their site.
Please do your own research on what is best for your home and geographic area.
This video is not sponsored.
I no longer have a website. The information is further down in the description.
➡ Brock Paver Base/Home Depot ~ https://www.homedepot.com/p/PAVERBASE...
➡ Here is the edging ~ https://www.menards.com/main/building...
➡Our blocks were 16" by 16" each, 8 blocks long by 7 (56)blocks wide or 128"(10.67 Ft.) by 112" (9.33 Ft.) The border is 16 inches all around extended from the patio portion. The 10 by 12 gazebo fits just over the patio portion.
https://www.menards.com/main/building...
Patio cost breakdown, not including gazebo and table set; (2016)
Paver pads: $254 Lowes or Home Depot
Paver blocks: $290 Menards
Edging: $110 Menards
Edging stakes: $56
Fabric/plastic: $25
Fabric pins: $27
Marking paint: $8
Sand leveling: $33
Sand locking: $14
Stones: $42
Total cost: $859
Gazebo
Lowes, Allen & Roth 10 X 12 https://www.lowes.com/
Install:
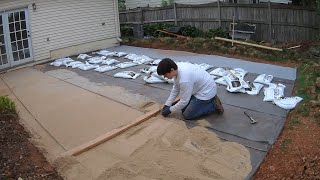
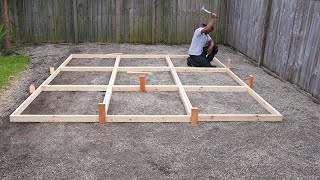
1) 16" x 16" blocks, 8 blocks long by 7 blocks wide equals 56 blocks total. The stone border was developed at the end of the project.
2) Mark out dimensions on grass with paint. The stakes represented the corners of the blocks. The outer painted border was 6" wider than the blocks and this represented where we would start removing the grass. In retrospect, I should have gone out 12" or more for the painted border.
3) Remove the grass and dirt as needed. This was the most difficult part of this project. It was a judgement call as to how deep we should go with the dirt removal. I wanted the blocks to be above the surrounding grass a little bit. You will have to adjust by temporarily placing a pad and block to get a feel for the finished height of the blocks compared to the level of the surrounding grass.
4) Level dirt with a long straight 2 x 4 and a level.
5) Tamp dirt down with a tamper. The weather was very dry when we did this project so the dirt was very hard. We had to wet the ground a bit and break some areas up with a shovel.
6) Layout weed prevention fabric and secure into the ground with plastic pins.
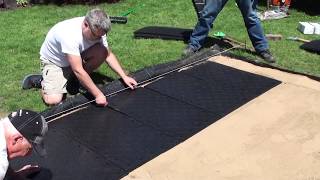
7) Spread and level sand to 0.5" depth. I used 0.5" diameter dowels taped together as guides to slide the 2 x 4 over. This process was tedious but we ended up with a nice level surface of leveling sand.
8) We started carefully placing the dense foam "paver pads" onto the sand first. These can take the place of having to use 2" of gravel as a secure base for your paver blocks. Then we started placing the blocks. I had to measure off of our house to be sure I was making a line of blocks that was straight and parallel to the house.
9) Stake down paver block edging border with stakes. Edging should have the triangle portion facing away from the patio. This helps to keep the blocks in place and keep them from shifting.
10) At this point we also brushed paver locking sand into the blocks and misted with water. I had a problem with the sand falling out of the edges of the blocks because there was nothing there to keep it inside. I eventually bought some grey colored clay and filled in the edges which helped to keep the locking sand in place.
11) Initially, we were going to have a grass border. This turned out to be a bad idea. Every time it rained the water would splash down on the dirt where we were trying to grow grass and it would send dirt flying all over the blocks and patio furniture. We came up with the idea of a stone border. Thankfully, this solved the dirt splashing problem.
12) The close up of the corner of our stone border shows that I used the same paver edging staked down over weed control fabric to contain the stones. This time the triangle edging is facing in, pointing towards the patio. Then just fill in with stones.
Note
We had ground that was flat to start with. It was, however, clay soil which is difficult to dig out. This project will take longer than a weekend. It will be work, but a lot less than using gravel.
This project worked well for us. We are not professionals and cannot guarantee it will work for everyone.
#budgetpatiodiy #paverpatio