Published On Dec 14, 2020
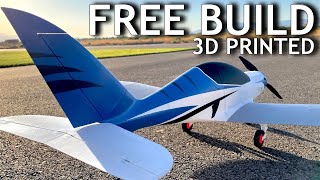
This is a full assemble video on how to build a 3D printed RC Tucano. Below is a link to all the parts and materials. Also I have all my surface layer 3 setting listed bellow. 2200grams RTF with 4S 4000 man battery.
Thank you so much for watching!
If you like videos like this, consider buying me a coffee, it really supports me:
https://www.buymeacoffee.com/troymcmi...
See what else I am working on: / troymcmillan_rc
https://www.tiktok.com/@troymcmillan_...
#3DPrinted,#RCAirplane, #ItFlies
Thank you so much to https://www.planeprint.com for sponsoring this build!
How to Print Thin Wall: • How to Print Thin Wall - Planeprint |...
Maiden Flight: • Maiden Flight RC 3D Printed Tucano - ...
Products Mentioned:
Super Tucano STL: https://www.planeprint.com/product-pa...
JGAurora A5S 3D Printer: https://amzn.to/3hn5cdN
JGMAKER MAGIC Printer: https://amzn.to/3nmonb6
Black PLA: https://amzn.to/3gMxS0a
White PLA: https://amzn.to/3ghcHl1
TPU: https://amzn.to/2Sw3Oe8
CA Glue: https://amzn.to/2J8EvNW
CA Accelerator: https://amzn.to/3fpbycz
5x HS-55 Servos: https://amzn.to/3oRnDKV
3548 1100KV Motor: https://amzn.to/3qXf3wg
60amp ESC: https://amzn.to/3nwXJw1
12x6 Propeller: https://amzn.to/2Knji3e
4S 4000mAh Battery: https://amzn.to/37fulV7
AR620 Receiver: https://amzn.to/3j4PbK4
DX6 Transmitter: https://amzn.to/3l6NFsD
3pin wire assortment: https://amzn.to/3l1xNYt
XT60 connector: https://amzn.to/3iyZWnf
5mm magnet: https://amzn.to/35ZPLoN
Screw assortment: https://amzn.to/2SvMxSs
2mm push rod ends: https://amzn.to/3nnjD4U
Z-Bend pliers: https://amzn.to/34mA0rt
Hot knife: https://amzn.to/34AGOB1
Drill Bits: https://amzn.to/3nIJzrx
Carbon Rods: https://www.readymaderc.com
*These are the settings I used for my JG A5S 3D Printer with Black Esun PLA. These settings are not going to work with every printer, or every PLA. Printers have different length bodin tubes, and PLA’s have different melting points. These may not work exactly for you, but should give you a good base to start with if you have a similar size printer. Good luck!
Profile 3 Cura Settings:
Quality:
Layer Height – 0.25
Line Width – 0.4
Shell:
Wall Line Count – 1
Infill:
Infill Density – 0
Material:
Printing Temperature – 215
Build Plate Temperature – 60
Flow – 100
Speed:
Print Speed – 100
Outer Wall Speed – 40
Inner Wall Speed – 40
Travel Speed – 100
Travel:
Enable Retraction – Checked
Retraction Distance – 4
Retraction Speed – 70
Retraction Extra Prime Amount – 0.7
Combing Mode – off
Cooling:
Enable Print Cooling – Checked
Fan Speed – 20
Mesh Fixes:
Union Overlapping Volumes – NOT Checked
Special Modes:
Surface Mode – Surface
Experimental:
Slicing Tolerance – Middle
Disclaimer: I am sponsored by some of the products I mention. However, all of my opinions are my own. Some of the above links are affiliate links, that does not effect the price you pay for a product, but I may receive a small commission if you make a purchase. This helps support my channel and allows me to continue to make videos like this. Thank you for your support!tor and propeller setup I used. I will show how I fixed the problem and take it out for another flight.