Published On Jul 25, 2022
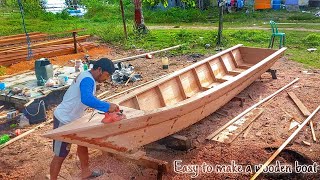
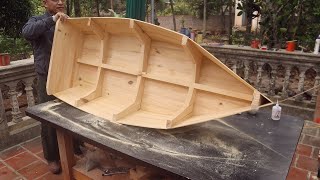
Weigh only 15 KG. You will be amazed to see how the canoe takes shape. See how well it goes on the water at the end. This mixed time-lapse video shows the build of a 14ft open canoe using two sheets of 3mm cheap non-marine grade ply without the need to wet or steam the hull during the process of pulling the two gunwales together, also called the torturing process. No stitch and glue. Just a small bottle of superglue ($1) and a lot of clear packaging tapes.
Please subscribe to watch a series of episodes of the build with step-by-step instructions together with failures and how to make good. I’d bet a whole bunch would start building this easy-to-build canoe. Yes, you can make this too.
Please leave a comment if you are interested to see the step-by-step videos building this canoe.
I am not a builder. I just like to make things. I could not believe it myself as the canoe takes shape. I decided to use non-marine ply and there is no way I can wet and steam the hull during the torturing process. I told my wife if it breaks halfway during building, then I can just forget about it. Thus using the cheap non-marine ply.
I did not use any powered tools building this canoe except a cordless drill driver when attaching the gunwales to the canoe. Which you can avoid if you have plenty of clamps. The gores or cuts remind me of a birch canoe build. The torturing reminds me of the way the Aboriginals of Australia built canoes using tree bark in the movie Ten Canoes a 2006 Australian drama film directed by Rolf de Heer and Peter Djigirr and starring Crusoe Kurddal.
I was inspired to build this canoe when watching Peter build his using the fly-mo design. I used a thinker timer for the gunwales. The bamboo seat is also quite heavy. The decks were heavy too. But 15 KG is perfect for me. It took quite a while to build this canoe. I work on it after work and more hours during the weekend. I had to wait for summer to apply resin and fibreglass.
All the materials were from bunnings home depot. I had to do a timber scarf joint for the gunwales. I had to re-do the workbench as the building progresses. I enjoy doing woodwork. I have also built a stand up paddleboard with a plan. I just roughly follow the shape of a stitch & glue touring open canoe by JEM-Craft. I will share the standup paddle boat building soon. I have asked my son to draw the plan too.
#plywoodcanoe #woodencanoe #DIY
0:00 Introduction
0:05 flexible cedar strips to get a fair line between offset points
0:16 measuring and marking the gores
0:43 exact copy of each ply
0:49 sawing the gores cutter knife for narrow gores
0:56 here comes the inspector
1:03 1: 12 scarf jointing the two sheets together
1:11 epoxy glue the sheets together
1:28 strips of masking tape to suport the gores
1:43 using superglue closed the gores
1:56 more masking tapes
2:14 the ply starts bending upwards
2:37 ready to attach the inwales
2:48 attaching the inwales
3:01 applying wood glue
3:15 lots of clamps
3:33 torturing the ply
3:47 the canoe starts taking shape
3:56 upward curve progressively reduces
4:06 closing the ends
4:28 fibreglass the hull
4:50 attaching the outwales
4:59 notice the canoe support?
5:11 fibreglassing the inside
5:28 the boat is extremely rigid
5:53 fixing the seat
6:04 lots of manual sanding
6:13 a few layers of epoxy
6:23 final touch
6:30 beautiful deck
7:01 the maiden voyage
7:26 total weigth 15kg
7:36 the canoe glides gracefully