Published On Jan 11, 2011
This is video #3 of a 3-part series. The videos are:
Part 1 of 3 = • Installing Round Corner Bead - Drywall Rep...
Part 2 of 3 = • Installing Round Corner Bead - Drywall Rep...
Part 3 of 3 = • Installing Round Corner Bead - Drywall Rep...
To Watch the Installing Round Corner Bead Playlist = http://www.youtube.com/view_play_list...
http://www.homeownerseries.com
INSTALLING ROUND CORNER BEAD
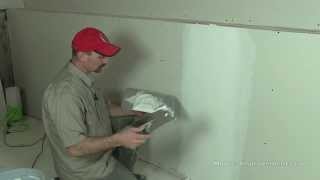
In order to completely smooth out the wall, the new corner will need to be feathered into the existing wall texture. To do this, take a wet rag and thoroughly rub the entire perimeter of the wall, blending the edge of the new drywall with the existing wall texture. Feathering creates a smooth transition between the rounded corner bead edge and the wall. A wet rag is used to do this and dissolves the drywall surface in place of sanding it away with a sanding block, which gets drywall dust all over the room and destroys the original wall texture. The new corner bead should be even with the existing wall, and appear to be nice and smooth.
Now the new corner bead can be textured to match the previous wall texture. For a project that requires this much texture, a hopper gun or sprayer should be used and can be bought or rented at a local home improvement store. Finally, the corner needs to be primed and painted and then the project is complete.