Published On Jan 29, 2021
Welcome to my channel, Homes for Beginners where I show you how to do repairs around the house yourself. Please don't forget to hit that LIKE button and SUBSCRIBE for future videos.
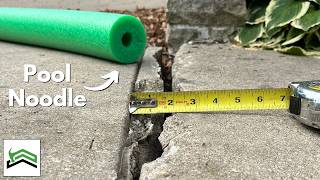
In this video I will be showing you how to patch honeycombing or holes in concrete. We recently had this concrete pad poured for a garage and sadly the contractor wasn’t as much of a professional as they described themselves to be. Honeycombing is caused by improper vibration of the concrete, a dry mixture, or the concrete setting up too fast.
Amazon links for various products used in the video for both USA and Canada:
USA
Cement patch: https://amzn.to/2YUuXKO
Pointed trowel: https://amzn.to/2MFqiKk
Wire brush: https://amzn.to/2Mx5F35
Canada
Cement patch: https://amzn.to/2Lu3bSs
Pointed trowel: https://amzn.to/3tt01Q5
Wire brush: https://amzn.to/3cOcWpW
There is quite a few spots that need to be repaired, some of the sides of the pad will be exposed and this isn’t the nicest to look at. This is an example of an aesthetic issue. In an extreme situation where any reinforcement is exposed, this would jeopardize the concrete structure and cannot be properly repaired using this method.
The pad is only a few days old, so I’d like to do this while the concrete is green to help promote adhesion.
Ensure the pad is dry and hasn’t rained recently. Clean the affected areas using a wire brush and a vacuum. The vacuum helps collect the debris as it’s loosened up. Loose debris may prevent the filler from fully adhering to the pockets. Any loose debris which falls out when applying the filler may also cause finish issues. Compressed air can also be used to clean any debris out of the pockets, this helps remove any debris.
Next is the product I’m using for a filler. There are various products available on the market, for me, I’m using Quikrete Anchoring Cement. While it’s primary intent is for anchoring or repairing anchor point, it’s other applications is for repair cracks or surface damage. This is a high strength expanding cement intended for outdoor use.
Mix the cement as per the instructions, so always refer to the product's specification. There will be a certain ratio between the mix and water. Add water slowly for a small amount, this is a quick setting cement, therefore if you mix too much, you may be left with excessive waste.
If you find the mixture is too thick, add more water. Too thick of a mixture won’t fill in holes as easily and may not leave a smooth finish. If you find the mixture is too runny, add more cement. If the mixture is too runny, it will not hold its form on vertical repairs and won’t have its full strength.
The consistency of my mixture should be able to hold its shape for a few seconds and then slowly move.
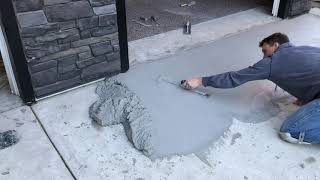
Using the putty knife, apply and force the cement mixture into the honeycombing and pockets.
Only apply a small amount at a time, so you don’t have excessive amounts falling on the ground as waste. Try to do this as quickly as possible, this type of mixture does set up quickly.
After that was finishing up with a small trowel, this is a pointed type that works great for small areas or tight places. Always make sure the trowel is clean and free of any surface debris which may prevent you from achieving a clean finish.
I have applied water to the trowel to help smoothen out the surface and prevent the cement mixture from sticking.
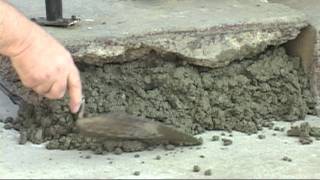
On another angle, I have already mixed up the cement. I’m working in about 2 to 3 foot sections to not get too far ahead of myself. This mixture sets up in about 10 minutes so my work time window is fairly small. Once that mixture sets up, it can no longer be used for the repairs.
Push the mixture into the holes using the putty knife. This will ensure it’s filled, when the mixture expands, it’s lock in place.
Once it’s in place, using the trowel, smoothing out the repair. With the wet trowel, you can work the mixture across the surface, filling in any missed spots. While the repair looks darker at the moment, once it dries and the water evaporates, it’ll lighten up in color.
The surface color will appear to be somewhat darker due to the work with the water or you may be left with some light roughness. To overcome this, here I’m using a mouse sander with 80 grit sandpaper. The concrete is harder, so the sandpaper gets used up fairly quickly. The 80 grit is rough enough to smoothen out the surface, yet it doesn’t leave a rough surface behind as what you may experience with wood.
After that, you can sweep off the surface to remove any dust. If you plan on applying some other surface type finish, then you’ll need to ensure the surface is completely clean of any dust or debris which may cause adhesion issues.
© Homes for Beginners 2019
All Rights Reserved
No part of this video or any of its contents may be reproduced, copied, modified or adapted, without the prior written consent of the author.